What is glulam cladding?
Holmen’s glulam cladding is made using high-quality, slow-grown wood from the forests of northern Sweden. With mostly vertical grain and a low moisture content on delivery, glulam cladding has a long service life and is dimensionally stable even under varying weather conditions. A smart choice of cladding – that is easy to get right, for an extremely attractive finish.
Untreated glulam cladding
Holmen’s untreated glulam cladding is an excellent option if you are happy to apply the right surface treatment yourself. Simply follow the finishing instructions and make sure the cladding is protected if stored outdoors. If you choose to use untreated glulam cladding indoors, for example as an elegant feature wall, the choice of surface treatment is up to you. In fact, it looks great even when left untreated.
Surface treated glulam cladding
Glulam cladding that has been treated with a suitably protective finish offers good durability and retains its original properties for a long period, even in changeable weather conditions. The length of time before the cladding requires maintenance varies depending on the climate, the location of the façade and the surface treatment. If a façade is in a particularly exposed position, this should inform the choice of surface treatment.
Holmen has one of Sweden’s most modern facilities for the surface treatment of exterior cladding. As part of our environmental work, we have minimised the use of chemical products and use a greater proportion of eco-friendly products within our operations.
We use the Sherwin-Williams paint system for priming and undercoating as standard. This can then be finished with a topcoat of any regular house paint from a reliably high-quality manufacturer, with the exception of distempers. The paints are documented and the application process checked to ensure that the paint is applied correctly
and forms a dry layer of at least 60 µm, in accordance with the paint supplier’s instructions. The cladding must be given its finishing topcoat no later than 6–10 months after installation, in accordance with the paint supplier’s instructions.
Ready-primed glulam cladding reduces the time needed for surface treatment on site. Glulam cladding treated with the right protective finish offers good durability and retains its original properties for a long period, even in changeable weather conditions.
Certification
Approval certificate – Façade cladding for exterior use
Performance declaration Kroksjön – Sawn, planed wood cladding
Performance declaration Bygdsiljum – Sawn, planed wood cladding
Swedish P-mark certificate
Installing glulam cladding
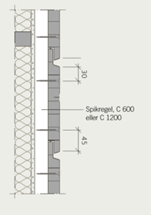
Glulam cladding should be installed using two screws or nails of the types listed in the table below, with a centre-to-centre spacing (CC) of 600 mm or 1200 mm.
| Screw/nail (mm) | Nailing batten (mm) | Surface treatment | CentrumCentre-to-centre spacing avstånd (mm) |
|
Panel screw 4.8 x 48 |
28 x 70 |
Acid-resistant stainless steel (A4)*Zinc/nickel |
600/1200 |
|
Panel screw 4.8 x 55 |
34 x 70 |
Acid-resistant stainless steel (A4)*Zinc/nickel |
600/1200 |
|
Framing nail 2.8 x 48 |
28 x 70 |
Acid-resistant stainless steel (A4)*Hot-dip galvanised |
600/1200 |
|
Framing nail 2.8 x 55 |
34 x 70 |
Acid-resistant stainless steel (A4)*Hot-dip galvanised |
600/1200 |
*Acid-resistant stainless steel (A4) in class C4 or surface treatments type approved in C4 for normal exterior use (zinc and nickel, for example). Corrosivity classes range from C1 – C5.
Nails or screws required per m2
| Cladding dimensions | CC 600 |
CC 1200 |
|
25×200 |
approx. 20 pcs |
approx. 10 pcs |
|
25×300 |
approx. 14 pcs |
approx. 7 pcs |

Photo: Glulam cladding instructions
Fitting requirements glulam cladding
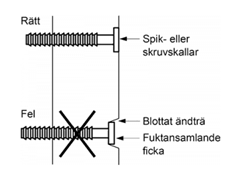
Exterior glulam cladding must be fitted so that the reverse side is ventilated with an air gap behind the cladding of at least 25 mm. Nails or screws must not penetrate the wind barrier behind or the air gap. When nailing or screwing cladding boards, the fixing should be inserted perpendicular to the board, so that the head is flush with the surface of the wood (see figure). When nailing or screwing with a power tool, the power should be set for the lowest occurring density of the wood. Protruding nail and screw heads should be driven in manually.

When nailing or screwing less than 150 mm from the end of the board, holes should be predrilled to avoid splitting. Cladding boards that have no tongue or groove on the ends should be connected with a butt joint over a support. The distance between butt joints following the length of the boards should be at least 3 000 mm. Butt joints in the next line of boards should be offset by at least 600 mm. Cladding with ends in tongue and groove can be joined between supports. End-tongue and groove joints in the next line of boards should be offset by at least 1 200 mm. There is a risk of the façade becoming damp and dirty from water splashes if the cladding terminates too close to the ground. The distance should be at least 300 mm, and the ground adjacent to the foundations should either be coarse gravel or designed in some other way to prevent splashing.
Handling and maintenance of glulam cladding
Handled correctly from delivery to installation, glulam cladding has low maintenance costs over its full service life. The wood cladding is supplied in weather-protective packaging and for the best end results the packaging should not be opened until installation time. If there is going to be a long time between delivery and installation, cladding should be stored in its intact packaging, raised from the ground on pallets to avoid damp.
The degree of maintenance required depends on the paint system, climate, façade design and colour. An annual visual inspection of the wood façade should be carried out. Particular attention should be paid to critical points such as end wood, joints, nails/screws, and terminations at ground level, corners and windows. Look out for mechanical damage, flaking, cracking and blistering. Damage to the surface treatment should be remedied through cleaning, scraping, oiling and touching up.

